ما داریم یه بازی دو بعدی میسازیم و برنامه نویس سیشارپ مسل به یونیتی برای نوشتن گیم پلی نیاز هست.


using UnityEngine;
 using System.Collections;
 //sajjad3011
 public class Indiana2 : MonoBehaviour {

     public Vector3 target; // The point user picks for the character to follow
     public bool facingRight = false; // Check where the character is facing
     private int move=0; // Movement direction
     private float maxSpeed = 5f; // Speed of character movement
     private Animator anim; // Reference to the animator


     // Use this for initialization
     void Start ()
     {
         anim = GetComponent<Animator> ();
     }

     void FixedUpdate()
     {
         // Obtaining target point user clicked on screen
         if (Input.GetMouseButton (0))
         {
             // After user has clicked left mouse button recording mouse position
             Vector3 mousePos = Input.mousePosition;
             // Converting mouse position into coordinate system connected to the camera.
             target = Camera.main.ScreenToWorldPoint (new Vector3 (mousePos.x, mousePos.y, 1f));

             // Set movement direction depending on target point
             if (target.x < transform.position.x)
                 move = -1;
             else if (target.x> transform.position.x)
                 move = 1;
             Debug.Log (move);
         }

         // Flip the character if nessessary
         if (move ==1 && ! facingRight)
             Flip ();
         if (move == -1 && facingRight)
             Flip();

         // check if arrived to target point
         if (Mathf.Abs (target.x - transform.position.x) < 0.2f)
         {
             move = 0;
         }

         anim.SetInteger ("Movement", Mathf.Abs(move));

         // apply velocity to actually make character move
         rigidbody2D.velocity = new Vector2 (move * maxSpeed, rigidbody2D.velocity.y);


     }


     void Flip()
     {
         Debug.Log ("In Flip");
         facingRight = !facingRight;
         Vector3 theScale = transform.localScale;
         theScale.x *= -1;
         transform.localScale = theScale;
     }
 }
کد بالا چیز خاصی نداره نقطه ی کلیک رو چک می کنیم اگه x اش بیشتر از پلیر بود move رو مثبت ویلا منفی می کنه.
using UnityEngine;
using System.Collections;
//csharp code
//Author:Sajjad3011
public class timer1 : MonoBehaviour {
    public Sprite[] sprArr=new Sprite[4];//set it in the inspector
    SpriteRenderer sprRndr1;
    private int i=0;
    // Use this for initialization
    void Start () {
        sprRndr1=this.gameObject.GetComponent<SpriteRenderer> ();//access to component SpriteRenderer
        InvokeRepeating("f1", 1.0f,1.0f);//call function f1() after 1 second


    }

    void  f1()
    {
        Debug.Log (i);
                sprRndr1.sprite = sprArr[i];
        i++;
        if (i > 3) i = 0;

    }//f1

}
منبع :gameover.blog.ir
مثال 1:
بررسی برخورد گیم ابجکت با تگ p2 به گیم ابجکت با تگ p1:
در اینجا اسکریپت رو میدیم به شی ای که تگ p1 داره.
بعدش به شی دوم تگ p2 می دیم.
یک تابع هم توش تعریف می کنیم مثلا برای صدمه خوردن به اسم ApplyDamage که عدد صدمه خوردن رو از ورودی می گیره و از میزان متغیر خون که نیاز به تعریفش هست کم می کنه و حالا روی ui text یا نوار خون نمایش میدیم با کد نویسی:
using UnityEngine;
using System.Collections;

public class ExampleClass : MonoBehaviour {
    void OnCollisionEnter2D(Collision2D coll) {
        if (coll.gameObject.tag == "p2")
            coll.gameObject.SendMessage("ApplyDamage", 10);

    }
}
مثال2:
using UnityEngine;
using System.Collections;

public class ExampleClass : MonoBehaviour {
    void OnCollisionEnter2D(Collision2D coll) {
        if (coll.gameObject.tag == "Enemy")
            coll.gameObject.SendMessage("ApplyDamage", 10);

    }
}
یه دونه هم اینجا گذاشته بودم قبلا :(بررسی برخورد اشیا در فاصله دلخواه روبرو)
منبع :gameover.blog.ir
برای اینکار ابتدا یک دوربین توی صحنه داریم.
یک فایل تصویری به اسم screenShot.png در مسیر جاری داریم.
یک اسکریپت csharp برای ایجاد دکمه ی آپلود می سازیم به اسم test.cs می سازیم و ربطش می دیم به دوربین:
![[تصویر: unity_design_script_upload.jpg]](http://s5.picofile.com/file/8146476276/unity_design_script_upload.jpg)
سورس اسکریپت سیشارپ test.cs :
//test.cs
using UnityEngine;
using System.Collections;

public class test : MonoBehaviour {

    // Use this for initialization
    void Start () {

    }

    // Update is called once per frame
    void Update () {

    }

    void OnGUI()
    {
        GUI.Label(new Rect(100, 0, 500, 20), Application.dataPath);
        if (GUI.Button(new Rect(100, 100, 150, 20), "Upload"))
        {
            UploadFile("http://yourSiteName.pergig.ir/upload/upload_file.php");
        }
    }

    IEnumerator UploadFileCo(string uploadURL)
    {
        print ("file://" + Application.dataPath + "/screenShot.png");
        WWW localFile = new WWW("file://" + Application.dataPath + "/screenShot.png");
        yield return localFile;
        WWWForm postForm = new WWWForm();
        postForm.AddBinaryData("file", localFile.bytes, "screenShot.png", "image/png");
        WWW upload = new WWW(uploadURL, postForm);
        yield return upload;
        if (upload.error == null)
        {
            Debug.Log(upload.text);
        }
        else
        {
            Debug.Log("Error during upload: " + upload.error);
        }
    }

    void UploadFile(string uploadURL)
    {
        StartCoroutine(UploadFileCo(uploadURL));
    }
}
کد بالا رو ذخیره کنید و بکشید روی دوربین رها کنید.
به جای "http://yourSiteName.pergig.ir/upload/upload_file.php" آدرس فایل upload_file.php رو بدید.
اینم سورس upload_file.php که باید روی یک هاست php بذاریدش:
//upload_file.php
<?php
$allowedExts = array("gif", "jpeg", "jpg", "png");
$temp = explode(".", $_FILES["file"]["name"]);
$extension = end($temp);

if ((($_FILES["file"]["type"] == "image/gif")
|| ($_FILES["file"]["type"] == "image/jpeg")
|| ($_FILES["file"]["type"] == "image/jpg")
|| ($_FILES["file"]["type"] == "image/pjpeg")
|| ($_FILES["file"]["type"] == "image/x-png")
|| ($_FILES["file"]["type"] == "image/png"))
&& ($_FILES["file"]["size"] < 20000)
&& in_array($extension, $allowedExts)) {
  if ($_FILES["file"]["error"] > 0) {
    echo "Return Code: " . $_FILES["file"]["error"] . "<br>";
  } else {
    echo "Upload: " . $_FILES["file"]["name"] . "<br>";
    echo "Type: " . $_FILES["file"]["type"] . "<br>";
    echo "Size: " . ($_FILES["file"]["size"] / 1024) . " kB<br>";
    echo "Temp file: " . $_FILES["file"]["tmp_name"] . "<br>";
    if (file_exists("upload/" . $_FILES["file"]["name"])) {
      echo $_FILES["file"]["name"] . " already exists. ";
    } else {
      move_uploaded_file($_FILES["file"]["tmp_name"], "upload/" . $_FILES["file"]["name"]);//move uploaded file into "upload" folder in current dir
      echo "Stored in: " . "upload/" . $_FILES["file"]["name"];
    }
  }
} else {
  echo "Invalid file";
}
?>
نکته: کد
<?php
move_uploaded_file($_FILES["file"]["tmp_name"], "upload/" . $_FILES["file"]["name"]);
?>
![[تصویر: upload_file.jpg]](http://s5.picofile.com/file/8146476292/upload_file.jpg)
![[تصویر: after_upload.jpg]](http://s5.picofile.com/file/8146476768/after_upload.jpg)
منبع :gameover.blog.ir
شکل کلی :
public void InvokeRepeating(string methodName, float time, float repeatRate);
توضیح :
اولین پارامتر اسم تابعی هست که می خوایم مدام اجراش کنیم.
دومین پارامتر زمان انتظار برای اولین شروع بر حسب ثانیه هست.
سومین پارامتر هم زمان تاخیر بین هر فراخوانی هست.
مثال: کد زیر بلافاصله(بعد از صفر ثانیه انتظار) تابع دلخواه رو اجرا می کنه و هر 1 ثانیه دوباره اونو اجرا می کنه:
InvokeRepeating("YOUR FUNCTION NAME", 0, 1.0f);دقت کنید که حتما باید توی Start بذاریدش نه update. مثال :
void Start () {
InvokeRepeating("f1", 1.0f,1.0f);//call function f1() every 1 second
}
در مثال فوق تابع f1 هر ثانیه یکبار فراخوانی میشه.
Invoke("YOUR FUNCTION NAME", 2);
using UnityEngine;
using System.Collections;
//Author:Sajjad3011
public class timer1 : MonoBehaviour {
	public Sprite[] sprArr=new Sprite[4];//set it in the inspector
	SpriteRenderer sprRndr1;
	private int i=0;
	// Use this for initialization
	void Start () {
		sprRndr1=this.gameObject.GetComponent<SpriteRenderer> ();//access to component SpriteRenderer
		InvokeRepeating("f1", 1.0f,1.0f);//call function f1() after 1 second


	}
	// Update is called once per frame
	void   Update () {

	}
	void  f1()
	{
		Debug.Log (i);
		sprRndr1.sprite = sprArr[i];
		i++;
		if (i > 3) i = 0;

	}//f1

}
public class PostURL : MonoBehaviour {

     void Start () {
         string url = "http://example.com/script.php";
         WWWForm form = new WWWForm();
         form.AddField("var1", "value1");
         form.AddField("var2", "value2");
         WWW www = new WWW(url, form);
         StartCoroutine(WaitForRequest(www));
     }
     IEnumerator WaitForRequest(WWW www)
     {
         yield return www
         // check for errors
         if (www.error == null)
         {
             Debug.Log("WWW Ok!: " + www.data);
         } else {
             Debug.Log("WWW Error: "+ www.error);
         }
     }
منبع:gameover.blog.ir
shift+A بزنید تا پنجره Add باز بشه.
یک سیلندر انتخاب کنید تا ایجاد بشه.
Tab بزنید تا به Edit mode بریم.
Z بزنید تا به مد سیمی wire بریم.
1 بزنید تا به نمای روبرو بریم.
5 بزنید تا به نمای دو بعدی(ارتوگرافیک بریم)(برای بازگشت به حالت پرسپکتیو بازم 5 می زنیم)
چند بار + رو بزنید تا zoom بشه.
A رو بزنید تا همه چیز از حالت انتخاب خارج بشه.
ctrl+tab زده و سپس روی حالت انتخاب راس ها بذارید.(vertex)
B بزنید و نصف سیلندر رو انتخاب و حذف کنید.(Delete و سپس vertices).
![[تصویر: ctrl_B.jpg]](http://s6.picofile.com/file/8222005334/ctrl_B.jpg)
دوباره Z می زنیم و به حالت غیر سیمی بر می گردیم.
5 می زنیم و از حالت ارتوگرافیک به حالت پرسپکتیو بازگشت می کنیم.
tab می زنیم و از Edit mode به Object mode سوئیچ می کنیم.
با راست کلیک ابجکت رو انتخاب می کنیم.
R و سپس Y زده و عدد منفی نود(-90) رو تایپ و enter می کنیم تا حول محور Y به اندازه ی زاویه ی 90 درجه به چپ بچرخه.
با کلید 4 و 6 و 8 و 2 می تونیم و همینطور اگه نیاز بود کلید ctrl می تونیم
مدل رو بچرخونیم و از زاویه های مختلف صحنه بهش نگاه کنیم.
برای اینکه تونل بهتری بسازید می تونید با shift+D یک کپی از مدل ساخته شده
بگیرید(D به معنی Duplicate هست) و با کلید S و حرکت ماوس مدل رو Scale
کنید.
سپس در نمای wireframe (کلید Z) و همون کلید هایی که گفتم از زوایای مختلف
بهش نگاه کنید و S و سپس X زده و طول تونل رو حول محور X با ماوس کوچک یا
زیاد کنید تا دقیقا طول هر دو یکی باشه.
سپس با کلید shift و راست کلیک می تونید هر دو تا رو انتخاب کنید و با کلید ctrl+J اونا رو join و تبدیل به یک مش برای ویرایش کنید.
بعد از اون می تونید طبق آموزش های قبلی قسمت های لازم رو به هم متصل و پر کنید
با کلید F بینشون پر میشه.
![[تصویر: select_and_Full_between_vertices.jpg]](http://s3.picofile.com/file/8222010326/select_and_Full_between_vertices.jpg)
(سوالی بود پ.خ)موفق باشید.
(سوالی بود پ.خ)موفق باشید.
منبع :gameover.blog.ir
متناسب کردن بازی با صفحات مختلف اندروید
داخل unity 5 در کادر هایرارکی(hierarchy یا کادر اجزای صحنه) دکمه ی create->ui رو بزنید و سپس یک button رو ایجاد کنید.
به صورت پیشفرض خودش یک کادر canvas ایجاد می کنه که باعث میشه همیشه دکمه یا اشیا ی واسط کاربری شما روی اون قرار بگیره.
بعدش حالت شناور بودن رو باید تنظیم کنید . مثل چپ چین،راست چین افقی یا عمودی و ....(در inspector قسمت rect transform ):
![[تصویر: shenavar_ui_unity5.jpg]](http://s6.picofile.com/file/8221964726/shenavar_ui_unity5.jpg)
using UnityEngine;
using System.Collections;

public class ExampleClass : MonoBehaviour {
    void Update() {
        Vector3 fwd = transform.TransformDirection(Vector3.forward);
        if (Physics.Raycast(transform.position, fwd, 10))
            print("There is something in front of the object!");

    }
}
منبع:
gameover.blog.ir
این PDF رو از zip در آورده و با برنامه ی Adobe Reader بخونید
منبع : http://www.unity3d.com
به لینک pdf زیر برید چند ثنیه صبر کرده و سپس رد تبلیغ بزنید:
نمی دونم چرا دوستان فقط چند نفر دانلود کردن.
توی این اموزش انواع فراخوانی تابع rayCast رو با مثال آوردم و کامل توضیح
دادم. توی سایت اصلی unity3d.com هم برید وبسایت نویسان unity3d.com
اشتباهاتی رو دارن که ممکنه جبران ناپذیر باشه. واسه همین اقدام به ترجمه و
تغییر نوع آموزش سایت unity3d.com کردم.
توی این آموزش سعی کردم کاربران زیادی رو از گیجی در بیارم تا بدونن وقتی
تابع Physics.Raycast یکبار به سه پارامتر و یکبار با دو پارامتر و یک بار
با 4 پارامتر فراخوانی میشه یعنی چی و چه ورودی هایی رو باید بده.
کاربرد:
مثلا اشعه پرت می کنه تا موانع رو detect کنه.
به هر جهت می خوای تا فاصله مشخص ray می اندازی
برای باز شدنانیمیشن درب در صورت اینکه دوربین از روبرو ببینه.
شرط می ذاری اگه tag مانع با تگ ما یکی بود کد بعدی رو اجرا کنه
بعدش انیمیشن اجرا کن(window=->Animation درب رو رو انیمیت کن)
loop Time =false بذارید تا انیمیشن تکرار نشه و فقط یه بار درب باز شه.
مثال :تشخیص مانع روبرو با استفاده از تگ:
bool isOpen=false;
float distance=3f;
 void myRaycast(){
RaycastHit hit;
Ray myRay = new Ray(transform.position, Vector3.forward);
if(Physics.Raycast (myRay, out hit, distance)){
if(hit.collider.tag == "door" && isOpen==false){
Animation.Play("openDoor");
isOpen=true;
}//if internal
}//if external
}//myRaycast()
gameover.blog.ir
سازنده:sajjad3011

هر مشکلی در دانلود بود بهم زنگ بزنید یا توی وبلاگ پیام بدید
یا پیامک بذارید
09358077198
//changeSprite runTime
//lang:csharp
//author:sajjad3011
//attach this script to your 2dobject sprite
using UnityEngine;
using System.Collections;

public class changeSprite : MonoBehaviour {
	public Sprite spr1;//set it in the inspector
	public Sprite spr2;//set it in the inspector
	SpriteRenderer sprRndr1;
	// Use this for initialization

	void Start(){
		sprRndr1=this.gameObject.GetComponent<SpriteRenderer> ();//access to component SpriteRenderer
	}
	// Update is called once per frame
	void Update () {
		if (Input.GetKey (KeyCode.Keypad1)||Input.GetKey (KeyCode.Alpha1)) {
			sprRndr1.sprite = spr1;
		}
		else
		if (Input.GetKey (KeyCode.Keypad2)||Input.GetKey (KeyCode.Alpha2)) {
			sprRndr1.sprite = spr2;
		}
	}
}
روش دوم بدون متغیر public و با استفاده از مسیر فایل png :
نکته ی بسیار مهم :
ابتدا حتما باید پوشه ای به مسیر Assets/Resources ایجاد کنید.
سپس پوشه ای که
حاوی اسپرایت ها هست بریزید توش. مثل spritesFolder به مسیر
Assets/Resources/spritesFolder
حال داخل پوشه ی Assets/Resources/spritesFolder یک فایل به اسم mySprite.png داریم که می خوایم با کد اونو در لحظه ی اجرا لود کنیم.
به زبان سیشارپ اینطوری می شه :
GetComponent<SpriteRenderer>().sprite =
    Resources.Load<Sprite>("spritesFolder/mySprite");
public GameObject cam1,cam2;
void Update () {

     if(Input.GetKey("1")){
       Debug.Log("Using Camera 1");
      cam1.SetActive(true);
      cam2.SetActive(false);
      }
  if(Input.GetKey("2")){
       Debug.Log("Using Camera 2");
      cam2.SetActive(true);
      cam1.SetActive(false);
      }
     }
Switching Cameras at runtime
![[تصویر: camera_switch_runTime.jpg]](http://s5.picofile.com/file/8127202568/camera_switch_runTime.jpg)
برای تغییر دوربین در بازی میخوام الگوریتم یا راهکاری رو برای حل این مسئله یاد بدم با توجه به تحقیقاتم.
اصل کار اینطوری هست :
function Update(){
       if(Input.GetKey("1")){
      Debug.Log("Using Camera One");
      camSwap(1);
       }
    }
    function camSwap(currentCam : int){

    }
function camSwap(currentCam : int){
     var cameras = GameObject.FindGameObjectsWithTag("cam");

     for (var cams : GameObject in cameras){
      cams.GetComponent(Camera).enabled = false;
     }
    }
var oneToUse : String = "Camera"+currentCam;
     gameObject.Find(oneToUse).GetComponent(Camera).enabled = true;
//js


    function Update () {
     if(Input.GetKey("1")){
      Debug.Log("Using Camera One");
      camSwap(1);
     }
     if(Input.GetKey("2")){
      Debug.Log("Using Camera Two");
      camSwap(2);
     }
     if(Input.GetKey("3")){
      Debug.Log("Using Camera Three");
      camSwap(3);
     }
    }

    function camSwap(currentCam : int){
     var cameras = GameObject.FindGameObjectsWithTag("cam");

     for (var cams : GameObject in cameras){
      cams.GetComponent(Camera).enabled = false;
     }

     var oneToUse : String = "Camera"+currentCam;
     gameObject.Find(oneToUse).GetComponent(Camera).enabled = true;
    }
//csharp

    using UnityEngine;
    using System.Collections;

    public class camControl : MonoBehaviour {

     void Update () {
      if(Input.GetKey("1")){
       Debug.Log("Using Camera One");
       camSwap(1);
      }
      if(Input.GetKey("2")){
       Debug.Log("Using Camera Two");
       camSwap(2);
      }
      if(Input.GetKey("3")){
       Debug.Log("Using Camera Three");
       camSwap(3);
      }
     }

     void camSwap(int currentCam){
      GameObject[] cameras = GameObject.FindGameObjectsWithTag("cam");

      foreach (GameObject cams in cameras){
       Camera theCam = cams.GetComponent<Camera>() as Camera;
       theCam.enabled = false;
      }

      string oneToUse = "Camera"+currentCam;
      Camera usedCam = GameObject.Find(oneToUse).GetComponent<Camera>() as Camera;
      usedCam.enabled = true;
     }
    }

using UnityEngine;
using System.Collections;

public class alpha : MonoBehaviour {

	public Color altColor = Color.black;
	public Renderer rend;

	//I do not know why you need this?
	void Example() {
		altColor.g = 0f;
		altColor.r = 0f;
		altColor.b = 0f;
		altColor.a = 0f;
	}

	void Start ()
	{
		//Call Example to set all color values to zero.
		Example();
		//Get the renderer of the object so we can access the color
		rend = GetComponent<Renderer>();
		//Set the initial color (0f,0f,0f,0f)
		rend.material.color = altColor;
	}

	void Update()
	{
		if (Input.GetKey (KeyCode.G)){
			//Alter the color
			altColor.g += 0.1f;
			//Assign the changed color to the material.
			rend.material.color = altColor;
		}
		if (Input.GetKey (KeyCode.R)){
			//Alter the color
			altColor.r += 0.1f;
			//Assign the changed color to the material.
			rend.material.color = altColor;
		}
		if (Input.GetKey (KeyCode.B)){
			//Alter the color
			altColor.b += 0.1f;
			//Assign the changed color to the material.
			rend.material.color = altColor;
		}
		if (Input.GetKey (KeyCode.A)){
			//Alter the color
			altColor.a += 0.1f;
			//Assign the changed color to the material.
			rend.material.color = altColor;
		}
	}
}
منبع اصلی که از روش ویرایش هایی رو انجام دادیم:
منبع:gameover.blog.ir
![[تصویر: water_unity.jpg]](http://s5.picofile.com/file/8117434550/water_unity.jpg)
![[تصویر: water2.jpg]](http://s5.picofile.com/file/8117438226/water2.jpg)
 )
)![[تصویر: importpackagewaterproonly.gif]](http://s5.picofile.com/file/8117441492/importpackagewaterproonly.gif)
![[تصویر: importPackage.gif]](http://s5.picofile.com/file/8117441942/importPackage.gif)
![[تصویر: drag_water.jpg]](http://s5.picofile.com/file/8117443226/drag_water.jpg)
![[تصویر: render1_water.jpg]](http://s5.picofile.com/file/8117444334/render1_water.jpg)
![[تصویر: render2_water.jpg]](http://s5.picofile.com/file/8117444850/render2_water.jpg)
![[تصویر: water_lastRender.jpg]](http://s5.picofile.com/file/8117445250/water_lastRender.jpg)
![[تصویر: green_water.jpg]](http://s5.picofile.com/file/8117450934/green_water.jpg)
منبع:gameover.blog.ir

حرکت دو بعدی پلیر در یونیتی به وسیله ی easy touch version 3
حرکت دو بعدی player
ویرایش:1/26/2016:
using UnityEngine;
using System.Collections;

public class DrawLine : MonoBehaviour
{
 //reference to LineRenderer component
 private LineRenderer line;
 //car to store mouse position on the screen
 private Vector3 mousePos;
 //assign a material to the Line Renderer in the Inspector
 public Material material;
 //number of lines drawn
 private int currLines = 0;

 void Update ()
 {
  //Create new Line on left mouse click(down)
  if(Input.GetMouseButtonDown(0))
  {
   //check if there is no line renderer created
   if(line == null){
    //create the line
    createLine();
   }
   //get the mouse position
   mousePos = Camera.main.ScreenToWorldPoint(Input.mousePosition);
   //set the z co ordinate to 0 as we are only interested in the xy axes
   mousePos.z = 0;
   //set the start point and end point of the line renderer
   line.SetPosition(0,mousePos);
   line.SetPosition(1,mousePos);
  }
  //if line renderer exists and left mouse button is click exited (up)
  else if(Input.GetMouseButtonUp(0) && line)
  {
   mousePos = Camera.main.ScreenToWorldPoint(Input.mousePosition);
   mousePos.z = 0;
   //set the end point of the line renderer to current mouse position
   line.SetPosition(1,mousePos);
   //set line as null once the line is created
   line = null;
   currLines++;
  }
  //if mouse button is held clicked and line exists
  else if(Input.GetMouseButton(0) && line)
  {
   mousePos = Camera.main.ScreenToWorldPoint(Input.mousePosition);
   mousePos.z = 0;
   //set the end position as current position but dont set line as null as the mouse click is not exited
   line.SetPosition(1, mousePos);
  }
 }

 //method to create line
 private void createLine()
 {
  //create a new empty gameobject and line renderer component
  line = new GameObject("Line"+currLines).AddComponent<LineRenderer>();
  //assign the material to the line
  line.material =  material;
  //set the number of points to the line
  line.SetVertexCount(2);
  //set the width
  line.SetWidth(0.15f,0.15f);
  //render line to the world origin and not to the object's position
  line.useWorldSpace = true;

 }
}
منبع اصلی:


//change camera Background Color
// press Left or Rihgt shift
//csharp language
//unity 5.1final
//Author:Sajjad3011
using UnityEngine;
using System.Collections;

public class cameraBackgroundColor : MonoBehaviour {
    private Camera cam;
    private     Vector4 color1;
    // Use this for initialization
    void Start () {

        color1= Camera.main.backgroundColor;
    }

    // Update is called once per frame
    void Update () {
        if (Input.GetKey (KeyCode.LeftShift) || Input.GetKey (KeyCode.RightShift))
        {
            Camera.main.backgroundColor=new Vector4(1F, 1f, 0, 0.1f);//Red,Green,Blue,Alpha
        }
        else
            Camera.main.backgroundColor=color1;
    }
}
منبع:gameover.blog.ir
--
how to check animation is compelete in unity
how to check animation finihed in unity5
-
کد cs:
private IEnumerator WaitForAnimation ( Animation animation )
    {
        do
        {
            yield return null;
        } while ( animation.isPlaying );
    }
کد js:
function WaitForAnimation ( Animation animation )
    {
        yield; while ( animation.isPlaying ) yield;
    }
منبع:
http://answers.unity3d.com/questions/37411/how-can-i-wait-for-an-animation-to-complete.htmlمثال بعدی:
function Die ()
 {
 animation.Play("die");
 yield WaitForSeconds (animation["die"].length);
 Destroy(this.gameObject); //destroys the object after animation ended
 }
animation["die"].length میاد طول زمانی انیمیشنی به اسم die(مردن) رو بر حسب ثانیه در میاره.
void Die ()
 {
 animation.Play("die");
 yield WaitForSeconds (animation["die"].length);
ادامه ی کد
 }
منبع:gameover.blog.ir
این یک کلیپ آموزشی که برای شما ساختیم:
http://www.mediafire.com/file/jdywgx70f07s3nh/mp4_ui_button_click_go_level.zip
حالا می تونی button رو به همون طریق ایجاد کنی و بذاری روش: create->ui->button
بعدش تکستچر دکمه رو توی inspector عوض کن . خصوصیت شناور بودن هم می تونی تنظیم کنی (چپ چین و راست چین و ....)
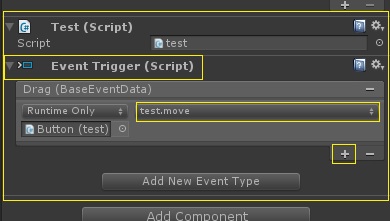
اگه می خوای واسه کلیکش هم کد بنویسی ابتدا انتخابش کن بعدش توی inspector
یک دکمه ی + مثبت هست اونو بزن یک فیلد اضافه میشه. گیم ابجکتی که می خوای
رو بکش بنداز روش.
حالا می تونی تابع دلخواهی که داخل اسکریپت های اون گیم ابجکت وجود داره رو از لیست انتخاب کنی برای اجرا.
اینم ببینید:
http://answers.unity3d.com/questions/922045/unity-5-ui-button-onclick.html
+
http://answers.unity3d.com/questions/942622/how-do-you-call-a-function-with-a-button-unity-5-u.html
using UnityEngine;
using UnityEngine.UI;
using System.Collections;
public class Move : MonoBehaviour {
	public Button btnExit;

	void Start ()
	{

		btnExit.onClick.AddListener(()=>{
			Application.Quit();

		});

}

using UnityEngine;
using System.Collections;

public class test : MonoBehaviour {

	// Use this for initialization
public void move(){
		transform.position = Input.mousePosition;
	}
}
منبع:gameover.blog.ir

به لینک زیر برید و چند ثانیه صبر کنید سپس رد تبلیغ رو بزنید:
منبع:gameover.blog.ir
با تشکر از سجاد به خاطر ارسال مطلب
موقعی که دارم خروجی apk می گیرم خطای زیر رو میده.این خطا برای چیه ؟
![[تصویر: android5_0_api_level_21.jpg]](http://s3.picofile.com/file/8208008234/android5_0_api_level_21.jpg)
加速下载(推荐)=Acceleration Download (recommended)

---------------------

普通下载=Normal download  این گزینه رو بزنید واسه دانلود

---------------------

买会员享提速特权,下载速度最高 提升200%=Members enjoy the privilege to buy speed, download speeds of up to 200% lift

---------------------

立即提速= Now Speed بالاخره من موفق شدم تمام خطاها رو با اعتماد به خودم رفع کنم خروجی apk بگیرم
![[تصویر: solved_2_android5_0_api_level_21.jpg]](http://s3.picofile.com/file/8208075600/solved_2_android5_0_api_level_21.jpg)
gameover.blog.ir
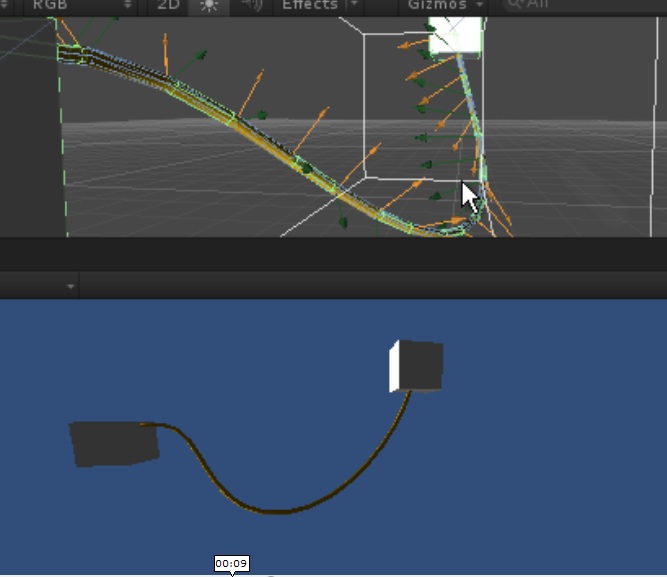
دانلود پکیج های طناب دو بعدی و سه بعدی(UltimateRopeEditor+RopeScriptPackage)
(رایگان شد)
به لینک یر برید و پس از چند لحظه انتظار،دکمه رد تبلیغ رو بزنید
RopeScriptPackage برای دو بعدی هست.

http://s8.picofile.com/file/8274543834/tut_Ultimate_Rope_Editor_1_10_sajjad.rar.html
اینم آموزش دو بعدی پکیج 2d rope system:(حجم:30 مگ کیفیت عالی. زبان اصلی):
